Anyway, onto the tutorial.....
It's easier if you gather your materials together before you start, so this what you will need:
Image - I used this one, but you can use anything you like
Distress Inks - at least two colours
Blender Tool or Cut'n'Dry Foam or if your really pushed a cosmetic sponge
Smooth White Card - the smoother the better, especially if you're not used to working with distress inks
Craft Sheet - if you haven't got one and don't want to invest in one, buy a non-stick cooking liner from Poundland
Pack of tissues
Water Barrel Brush
Glimmer Mist (optional)
Paper (cheap printer paper is fine)
Low tack masking tape
1. Cut the card to the desired size and put to one side.
2. Open a word processing document (I'm using Word for this tutorial but you can use Open Office as it does pretty much the same thing).
3. Import your image.
4. Place your mouse above the image and then right click the image and select format picture from the drop down list. A grey box will appear, along the top there will be a series of tabs, select the layout one and then behind text, click OK.
5. Right click the image again and select format picture. Then select the tab marked size. Ensure the lock aspect ratio box is ticked and then size the image to fit your project (remembering that you are going to eventually have two of the images on your work). Click OK.
6. Then right click the image and select copy and then right click again and select paste.
7. Holding the left mouse button down, drag the image below the original image as shown below.

8. Ensure the second image is still selected (it will have a green dot at the top and white dots in the corner), go to draw and then select rotate or flip and then select vertical.
9. Hold the left mouse button down and then drag the image into position as shown below.

10. Ensure the bottom image is selected, then right click, edit image and select the tab marked Picture, halfway down the box it says colour, click the drop down box and select either washout or greyscale depending upon your projects requirements. Your images should now look something like this.

11. Mark the top left hand corner of the printer paper with a cross, then print the image onto paper. If you have a top feed printer the image should have printed in the bottom right hand corner. If your printer is not a top feed, you will need to figure out where the image will print, but by marking the cross it should simply things.
12. Put to one side.
Next create your background. If you've not used distress inks before it may take you a few plays to achieve the result you want, but once you've sussed it you'll be able to do it in minutes. Just remember to use the ink sparingly, you can always add more, but you can't remove it. You're going to have to forgive the state of my mat, it's my old one that I use for Promarkers and Stazon projects.
13. Place your smooth card onto the craft sheet, take the lightest colour ink you are using and dab the blender tool onto the pad. Starting on the craft sheet work in circular motions towards the centre of the card, don't worry if it looks a bit patchy it will just add to the effect. I normally leave a small area white (see the picture below) but it's upto you how you want to do it. Once you're happy with the colour (remembering that you can always add more ink) change to the next colour in your palette and repeat the above, but don't work quite as far into the centre. Repeat the above as many times as you wish until you've achieved the desired effect, you now have your background.
 |
| One colour |
 |
| Two colours |
15. Now take your background and position it over the image. Move it around until you have positioned it perfectly. Secure the background onto the paper using low tack masking tape (see the picture below).

16. Remove from the window and place the paper back into the printer ensuring that the cross is in the top left hand corner, then hit the print button. You should now have the image printed onto your background exactly where you wanted it.

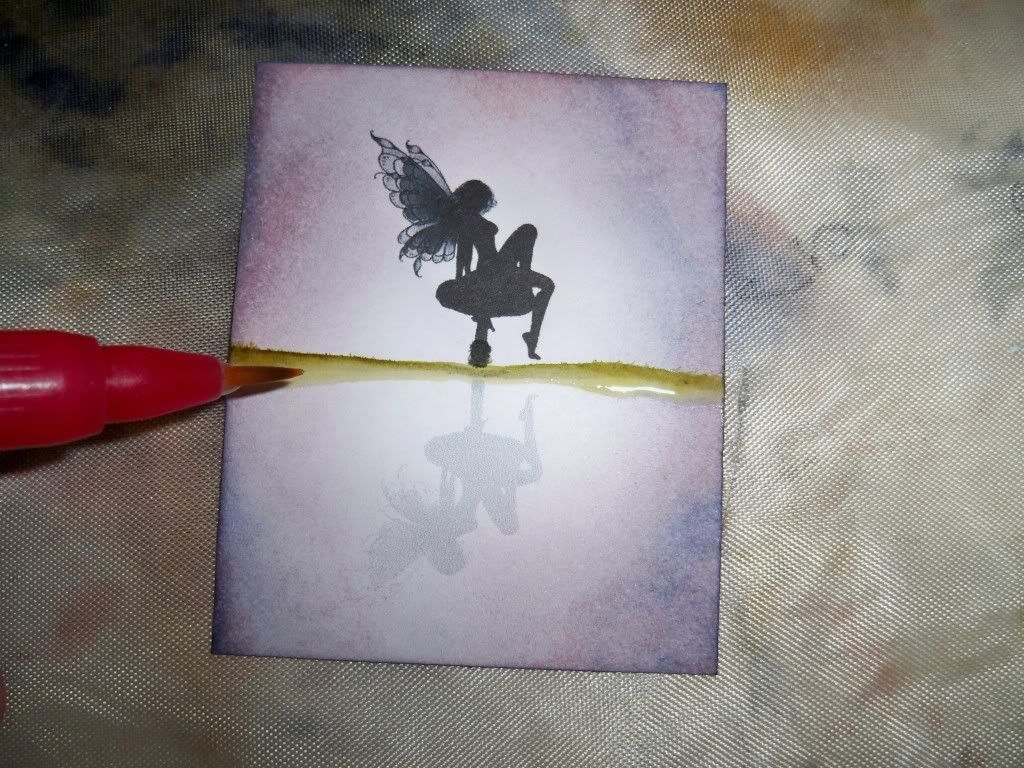
The final step is to ground the image and add details like the moon and ripples in the water. Big tip don't try to take photographs of yourself doing this otherwise you might accidentally touch the image and make the ink bleed as in my photo :)
 |
| Grounding the image |
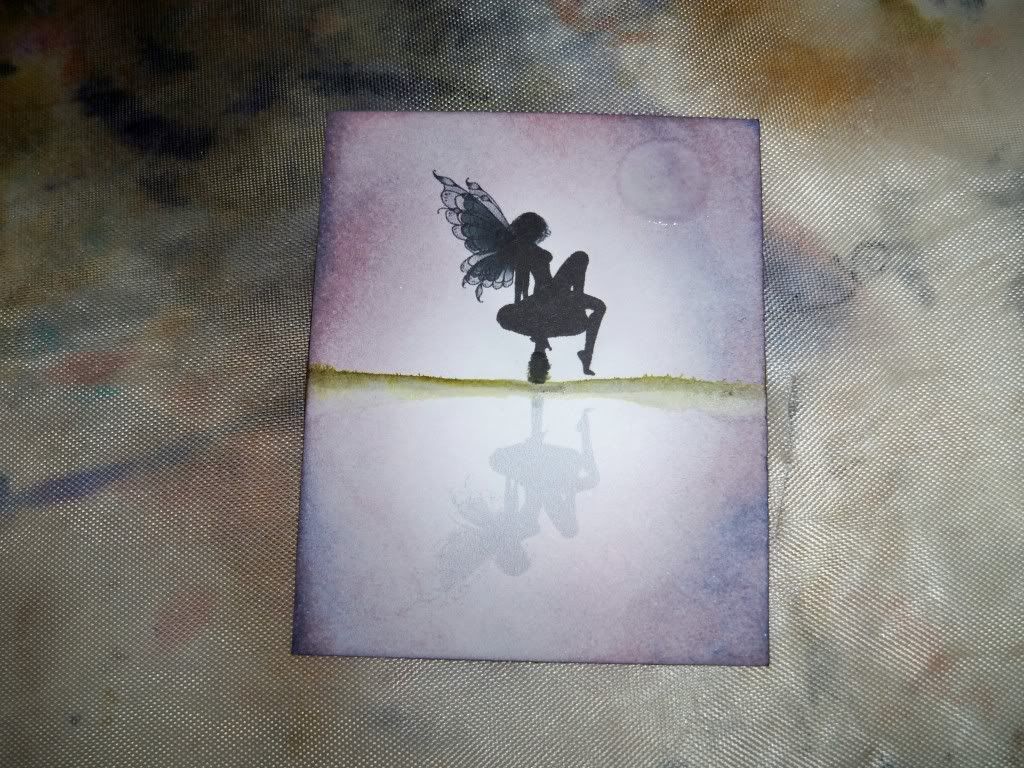 |
| creating the moon |
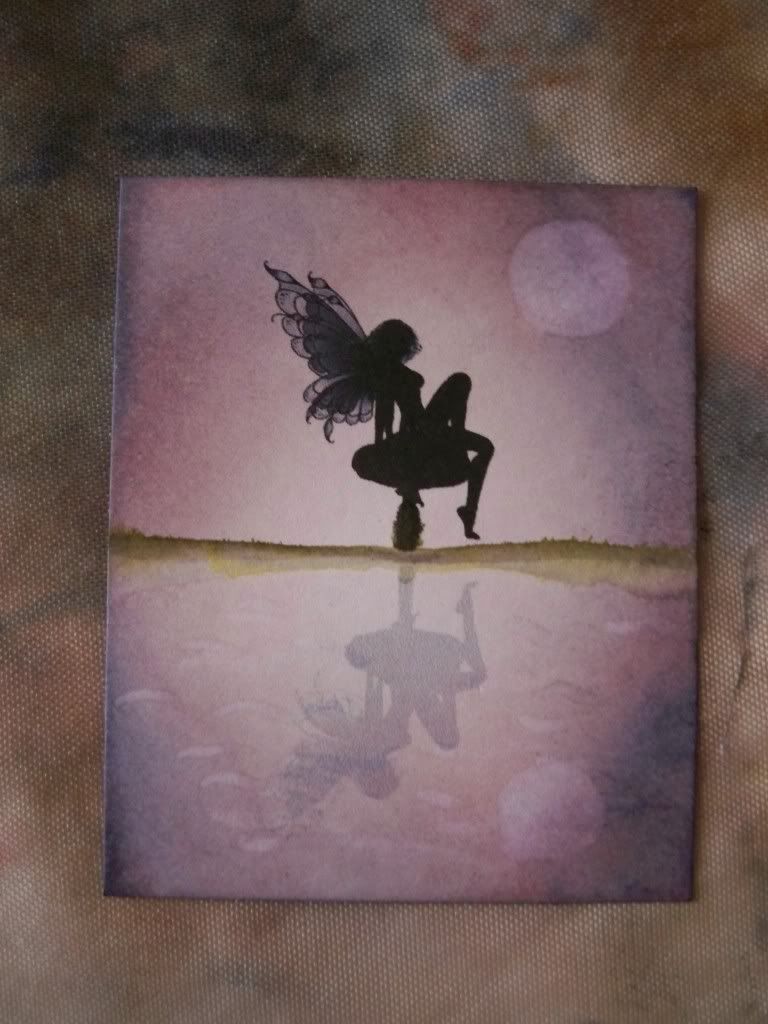 |
| the finished project |
At this stage I often give the image a little spritz of glimmer mist and run a little stickles down the edges of the wings.
That's it - I hope my instructions are clear (if not please feel free to make suggestions and I'll try to adapt things to suit) and that you've managed to achieve the effect you wanted.
Thank you for that tutorial - explained brilliantly itching to have a go xx
ReplyDeleteFab tutorial I will have to give it a go.
ReplyDeleteThankyou so much for your detailed tutorial I will certainly give it a go. xx
ReplyDeletewow great tutorial, amazing images. hugs chris xx
ReplyDeleteThat is one awesome tutorial. Thank you so much. Hugs, Nataliya.
ReplyDeleteFantastic tutorial, thank you! x
ReplyDeleteWow, you are so clever x
ReplyDeleteThank you for such a clear explanation, I've not fancied distressed inks - until now!! x
ReplyDeleteWOW Great effect and tut Nat ty
ReplyDeletethanks for a fantabulous tutorial
ReplyDeleteWow this is wonderful - thanks for sharing the tutorial x x
ReplyDelete