Saturday 26 June 2010

Bling it on!

I've gone all girly and sparkly today! I've made this card for a friends birthday and she lurveeees the whole bling thing, but isn't into pink.

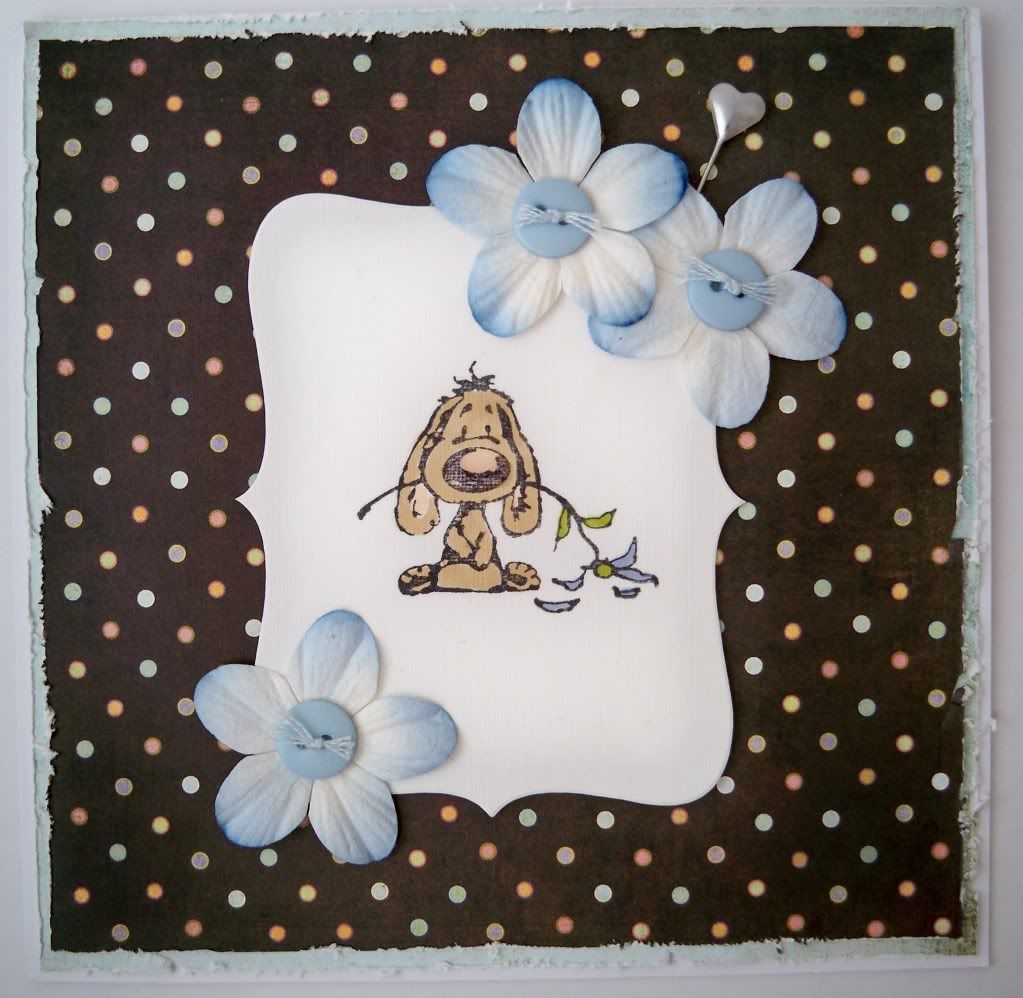
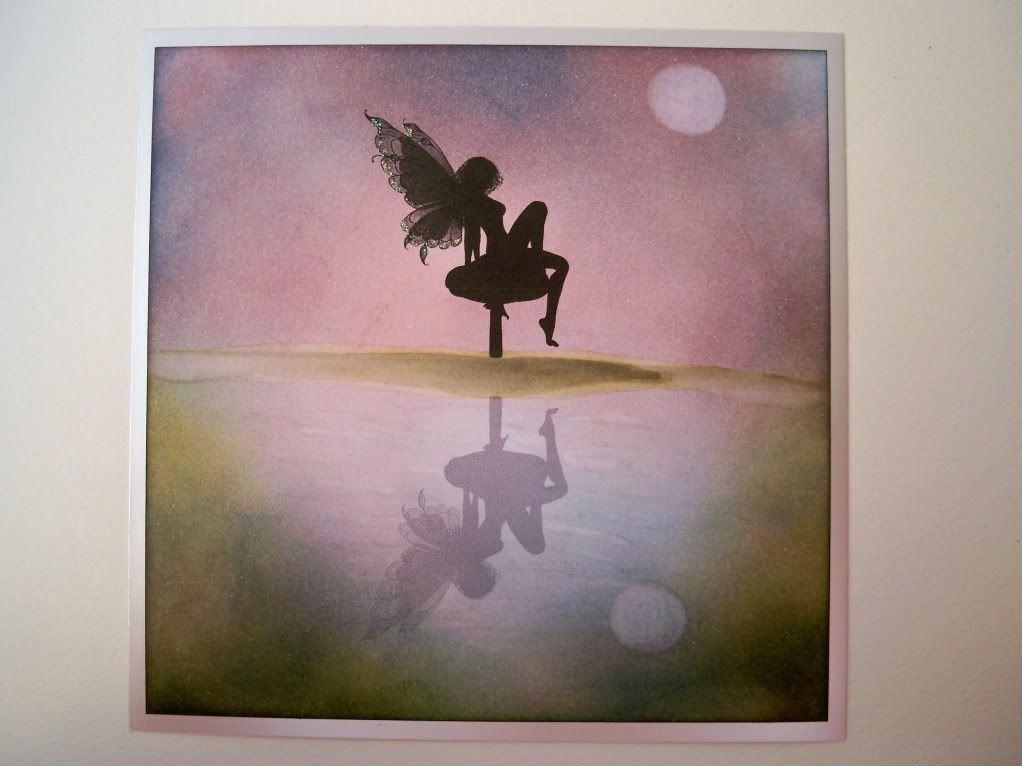
I decided I'd try out one of the stamps I'd won a few weeks ago from Cuddlybuddly Crafts. Then I had the idea of trying a few new things out - Co-ordinations Whitewash Cardstock, sanding embossed card and using my new Martha Stewart butterfly punch. I had heaps of fun ripping, tearing and generally destroying paper and card and then chucking loads of sparkle at it! Here's my creation:


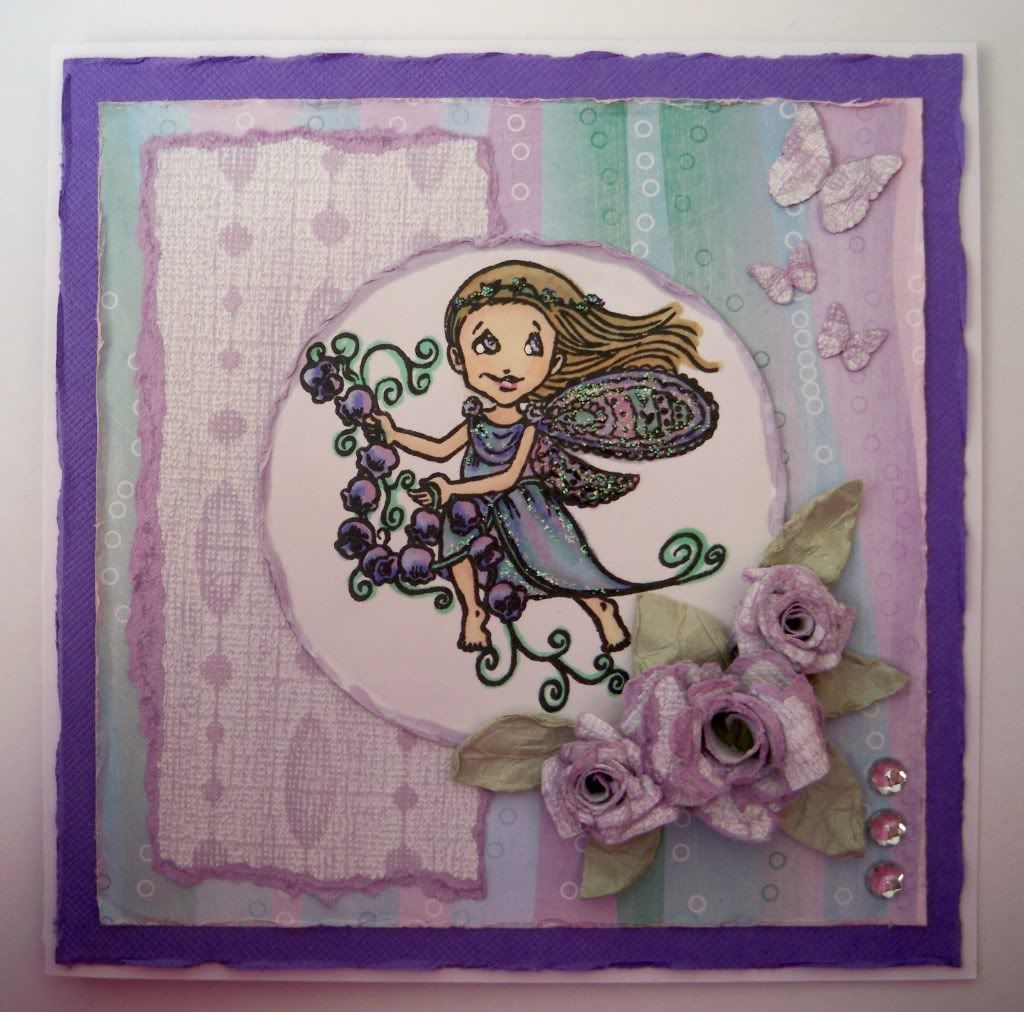
The fairy has been coloured with Promarkers. I've then used 3D glitter glue to highlight her wings and dress. I've distressed the edges of just about everything in sight. The embossed panel has been sanded. The roses and leaves are handmade and have been given the Stickles treatment as have the butterflies.

Tools
Bigshot
Martha Stewart Butterfly Punch
Tweezers
Sizzix Texturz Beadz Embossing Plate
Stamp - Spring Fairy from Cuddly Buddly Crafts

Materials
Card base - Craftwork Cards
White, Green and Purple Cardstock/ BP - The Papermill
DP - freebie in a magazine
Co-ordinations Whitewash Cardstock
Ranger Stickles
3D Glitter Glue
Diamontes - stash

I'd like to enter this card into the following challenges:
Mel's MSE challenge - use Purple/Lilac
I Did it Creations Challenge Blog - 3D
Allsorts Challenge Blog - Embossing
Creative Craft Challenges - Stamp It Up
Crafty Creations - Shine
Bunny Zoe - Nice and Girly
Cowgirl's Sunday Challenge - Anything goes
Shelly's Images - The Rule of 3's
Digi Doddles Shop's Best - Anything goes
Kaboodle Blog - Anything goes with a dash of Purple

Friday 25 June 2010

My first ATC

I took part in my first ever ATC swap recently. My swap partner was the lovely Sarah from Rainmac's Place I've already blogged the gorgeous ATC and card she sent me, I just hope she likes my offerings as much!

The theme of the swap was embossing. I've never made an ATC before, but will definitely be making more as there is so much scope for incorporating them into other pieces of work. I also really enjoyed working in small space.


The background was created using distress inks and the blender tool. The images have been stamped in black ink and then heat embossed three times to give a really glossy finish.

Tools:
Heat Gun
Tim Holtz Blender Tool

Materials:
ATC - made using white card from The Papermill
Embossing Powder
Archival Ink
Tim Holtz Distress Inks - Victorian Velvet, Broken China, Chipped Sapphire, Forest Moss

I'd like to enter this ATC into the following challenges:
Sew Many Challenges - Anything goes
Crafty Cardmakers - Oldest, lateset or greatest

It's a doodle!

I made this card to accompany my ATC. Rainmac was a brilliant swap partner and very understanding of the fact that I didn't post my ATC off to her when I said I would. I sent this little thank you card to go with the ATC.


The flower was created by stamping a sun image several times onto an old book. The image was then cut out and coloured with distress inks. It's then been stacked up and micro beads have been poured into the centre and covered with Glossy Accents. The word stem has been doodled. I'm quite pleased with the doodling, and will definitely be using this on future projects.

Tools:
Tim Holtz Blender Tool
Sunshine Stamp - Freebie with a magazine
Tim Holtz Distressing Tool

Materials:
Cream Card - from stash
Green Sparkle Card - The Papermill
Old book - charity shop
Tim Holtz Distress Inks - Scattered Straw, Forest Moss, Tea Dye
Glossy Accents
Glass Micro Beads - from stash
Letraset Fine Liner

I'd like to enter this card into the following challenges:
Crazy 4 Challenges - Paper Flowers
Cute Card Thursday - Reuse, Renew, Recycle
The ABC Challenge - Xtra Dimension
Sew Many Challenges - Anything Goes

Crafty Place ATC Swap

I decided that I'd join in with this months ATC swap over at the Crafty Place. I've never made an ATC nor participated in a swap, so I was a little apprehensive. I needn't have worried, my swap partner was the lovely Sarah (aka Rainmac).Here's the gorgeous ATC she sent me:

And this is a lovely thank you card that she sent:

Thanks for being my swap partner Sarah, I just hope you enjoy my offerings as much I've enjoyed yours.

Friday 18 June 2010

This is more like it!

Well after yesterdays horrendous bowling card episode (will update the previous post with a revised version of it!!), I decided I'd better my butt into gear and make my Grandad a Father's Day. I know he's not my Dad, but he's 90 this year and very special to both me and my children and it is a day when I can show him how much he's loved and respected.

This is the card I've made for him

The card base was cut using nesties. The image has been created using distress inks and stamps. I had a little problem with the perspective, and rather bin the whole image, I cheated it good by punching out the good part. For some weird reason I couldn't find my black ribbon, so I coloured white ribbon with Promarkers.

Tools
Sizzix Bigshot
Spellbinder Nestabilities - Labels 8 & Large Circles
Fiskars Circle Punch
Tim Holtz Blending Tool
Water Barrel Brush

Materials
White & black card - The Papermill
DP - The Hampstead Collection by Papermania
Promarkers - black
Ribbon - from stash
Card Candy - Craftwork Cards
Tim Holtz Distress Inks - Forest Moss, Tea Dye, Chipped Sapphire, Broken China
Stamps by Hobbyart - Winter Scene Its

I'd like to enter this card into the following challenges:
Crafty Catz - Shaped Cards
Crafty Cardmakers - Mens cards
Cards for Men - Father's Day
Meljen's Designs - Fibre, Ribbon & Lace
One Stitch at a Time - Celebrations
Pear Tree Designs - Father's Day
Simple Doodles - Just 4 you Dad
Totally Gorgeous - for the boys

Thursday 17 June 2010

HELP - Decoupage - bleaurghhhh!!!!

Does anyone else make a card and absolutely hate it? Well I have and this is one of them!

My Dad plays bowls and back in January when I first started playing with paper and making cards, I saw this "fab" decoupage sheet and thought "that'll do for Father's Day". When I got it out today, I knew that I'd made a big mistake as I was totally un-inispired by it, but decided I'd roll with it anyway!

I'm not sure what's wrong with the card (other than it's pants) - is it the colours, maybe white would've been better? Is it the size of the decoupage? Is it the sentiment? I don't know, all I do know is that I hate this card, so if anyone has any ideas or suggestions (other than binning it, which may well happen), please feel free to let me know.

Oh and btw I am never, ever, ever going to buy decoupage sheets again, gimme my stamps any day!


Thank you very much ladies for all your help and advice. I'm still not thrilled with the card, but it's looking heaps better. I think I'll stick to my stamps and paint brushes in future!!  Here's the new version:

UTEE Cufflinks

As some of you know I popped along to the Craft Barn Extravaganza this weekend and spent most of my time with the fantastic Suze Weinberg. Not only did I come away with heaps of inspiration, but she also gave me a necklace she'd made. If you get the chance to see her in action do go, she's just one of the nicest and most hugely talented artists there is!

Sadly, I'm totally skint this month, so no Meltpot for me, but I did buy some beeswax, clear UTEE and foil cake cases. Today I've had a chance to play and I soooo NEED a Meltpot, if only to stop me getting third degree burns!

It's DH's birthday today and I really wanted to make him something special. I've had an idea in my head for a while to make a pair of cuff links with pictures of the kids on, but have tried shrink plastic and glass cabochons with no luck. He's away from us a lot on business, and loves things that remind him of us, so this seemed the perfect gift.

Whilst playing with the UTEE, I decided I'd try the cuff links and it was a success!!! I had a few mini disasters along the way, but I think the finished project looks kinda cool and I'm actually really pleased with the way it's turned out! I'm going to keep the disasters and see if I can use them in another project. Anyway here are the cuff links (excuse the piccy found these a bit tricky to photograph).


Here's a little box I made to present and store them in


Tools
Heat gun
Non-stick Craft sheet
Martha Stewart Scoreboard
Guillotine

Materials
Black Glitter Card - The Papermill
Ribbon - Papermainia
Card Candy - Craftwork Cards
Photocopies
Cuff link Blanks
UTEE Clear
Glossy Accents

I'd like to enter this project into the following challenges:
Craftalicious - New (UTEE never used it before, so it's new to me)
Creative Inspirations - One for the Boys
Magical Crafts - Something for a Male/Father's Day
Meljen's Designs - Fibre, Ribbon, Lace (Ribbon on the box)

Friday 11 June 2010

It's not a card!!!! My first scrapbook page

Well I've finally done it!!!!! I've jumped into the big bad world of scrapping......I've been meaning to give it a go for a little while, but never quite got round to it, so when the lovely Choccy  reminded everyone that the current Creative Craftworld Challenge was for a scrapbook layout with Father's as the theme, it was the push I needed. Especially as I've not done a great deal for DH's birthday or Father's Day atm, so this will be a little something for the kids to give him.

Now as with everything new I try I always ask the question is did I enjoy it?? Well I think so would be my answer - I don't think I'm an overnight convert to scrapping!!!!! Whilst I loved looking at long forgotton photos, I found it very time consuming! Also, although I'd thought about scrapbooking, I'd always had in my mind my first one would be of a holiday, so doing something with the theme father's kinda threw me!

However, I'm glad I've done it. The page I've produced is OKish - I'm not thrilled with it, but for a first attempt it could've been worse and I'm sure DH will appreciate it. I'm definately going to be doing more pages as it means that many of my cherished pictures will see light of day instead of sitting in a drawer and hopefully the more I do the easier it will become. Anyway, enough rambling, this is it.................


The edges of the papers have been inked with distress inks. The chipboard letters have been covered with paper, inked and then glossy accented. The buttons were coloured with Promarkers. I made the flower and handcut the vines (the link to the tutorial can be found below).

Tools
Bigshot
X-Cut Scalloped Border Punch
X-Cut Butterfly Punch
Spellbinder Nestabilities - Labels Eight

Materials
Papers - Papermania Hampstead Collection
Distress Inks -Forest Moss, Tea Dye
Flowers & Vines Handcut/made from here
Promarkers - Pear Green & Burnt Umber
Woodware Chipboard Alphabet
Buttons
Glossy Accents

I'd like to enter this into the following challenges:
Creative Craftworld - Fathers
Sir Stampalot - Punch It (2nd entry but different project) - border strip is punched as is the edge of the flower
One Stitch at a Time - Boys to Men
A Spoonful of Sugar - Floral Delight
C.R.A.F.T - Father's Day/Men

Saturday 5 June 2010

An experiment - playing with fairies, inks & water!!!

I've been wanting to create a card like this for ages, but as I haven't got a brayer (or an eraser that's large enough for my stamp) I've not been able to. Anyway, I decided I'd see what happened when I played with the fairy image from Stitchy Bear Stamps, and this was the result:

It's not perfect, but on the whole I'm not too unhappy with the overall result. I'm defiantely going to play with this image some more and will try some different ideas that I've had as well as adjusting a couple of things that I know are wrong on this one.

I created the background with my new fave toy Distress Inks. The image was then printed directly onto the card. The ripples and moons have been created using a water brush and tissues. The strip of land used to anchor the image was painted using Distress Inks and given a light wash to blend the ink. I've run 3d glitter glue along the wing tips. The image has been matted onto silver mirror board prior to mounting on the cardbase.

Tools
Purple Cows Guillotine
Water Barrel Brush

Materials
White Cardstock - The Papermill
Silver Mirror Board - Create & Craft
Tim Holtz Distress Inks - Spun Sugar, Victorian Velvet, Broken China, Chipped Sapphire & Forest Moss
Pack of Tissues
Glitz-It - 3D Glitter Glue

I'd like to enter this card into the following challenge:
Stamp Something - Digi

Wednesday 2 June 2010

Monochromatic Wanna Be......Father's Day Card

I've been trying to encourage the kids to make their Dad a Birthday Card and a Father's Day Card, but neither of them are showing any interest, so I figured I'd better get cracking, otherwise the poor bloke will have nothing!

I have a photograph of my DS when he was about 2 1/2 dressed up in his Dad's clothes and when I stumbled across this image it bought back so many memories that I just knew that I had to do something with it.


I've used Promarkers to colour the image. I found this one quite tricky to colour and managed to mess up the tie! So, I've had to cheat it good by cutting out another tie and colouring in and then decoupaging it onto the main image. Hopefully, no-one else, other than you guys will know what has happened!!

Tools
Bigshot
Spellbinder Nestabilities - Circles
Xyron Sticker Machine
Purple Cows Guillotine

Materials
Card Base - Craftwork Cards
Mirror Board - Create & Craft TV
Paper - Creative Imaginations
Digi Stamp from here
Ribbon from stash
Card Candy - Craftwork Cards
Sentiments - computer generated

I'd like to enter this card into the following challenges:


Really Reasonable Ribbons - Male card using ribbon
Simon Says Challenge - Father's Day
ICS - Pick A Sketch (I've used number 68)
Allsorts - Black, White and One Other (Black ,White and Silver)
Totally PaperCrafts Challenge - Monochromatic

Tuesday 1 June 2010

Silhouette Fairy Easel

It's my niece's birthday in a couple of weeks and she's still secretly mad about fairies. She'll be 14, and worries that her friends will tease her, so keeps her obsession a deep dark secret. I'm hoping that this card will convince her that fairies are for big girls too!!


The easel card was cut using my new Nestie's Labels 8. I then used Distress Inks to make the background and used the digital masking technique to place the digital stamp (kindly given to me by Stitchy Bear Stamps, available here) onto the card. I've added some dimensional glitter glue the tips of the fairy's wings. The leaves and flowers have been punched from black paper.

Tools
Big Shot
X-Cut Botanicals Ivy Punch
Nellie Snellen - Flower Punches
Epson Printer

Materials
White Card - The Papermill
Black Paper - from stash
Tim Holtz Distress Ink - Spun Sugar, Victorian Velvet, Broken China, Chipped Sapphire and Forest Moss
Diamontes - Poundland
Digital Stamp "Relax"  - Stitchy Bear Stamps

I'd like to enter this card into the following challenges:
Sir Stampalot Challenge - Punch It!
Totally Gorjuss - Wings!
A Spoonful of Sugar - Celebrations!
Flutterby Wednesdays - Anything goes
Cute Card Thursdays - No Designer Papers
Related Posts Plugin for WordPress, Blogger...