A blog about Mixed Media, Paper Crafts, Altered Art and bit of card making thrown in for good measure. You will also find the odd tutorial and giveaway.
Monday, 5 May 2014
I Need A Hero!!
Well not anymore I don't! I have this little fella - isn't he just the cutest? This is another sample that I made for the release of Work & Play 2, I so hope you that like this collection as much as I do! I can honestly say that it has been a longtime since I've felt this inspired by any images and I could happily sit and play with these for days!!
As soon as I saw him I knew in an instant what I wanted to do (infact I have three plans for him, but the other two will have to wait). So I created another of those little card bases I showed you here the other day and set to work.
Before I got too involved with the card though I had to source some green netting, so I popped to the shop with the intention of getting a bag of lemons and using the mesh from that, but then I spied the perfect netting surrounding a bag of organic onions! The best part was they were British onions and were no dearer than the imported ones I normally buy - so it was a win win kind of thing! Anyway, I digress!
Once I'd got the netting, I started to cut it around only to discover that it started to disintegrate :( so I had to find a way of stopping it. The only thing I could think of was to gently melt it in a candle flame - this worked but needed extreme care so that it didn't melt away altogether. Once I'd secured the edges I sewed the side seams together so that it popped neatly over the card and could then be glued securely into place.
I punched a pile of leaves using an old punch that I found in my stash and coloured them up using Graph'It Markers. The leaves were then glued into place on the mesh.
I cut the soldier out and coloured him with Graph'It markers before adding him to the scene. The dog tag was created from one of the ticket sentiments that are on the CD - I simply cut out the inner part of the ticket and then punched a hole and added some chain. The little stars are made from air drying clay that has been painted with Silver Paint.
Thanks for stopping by today.
Claire x
Supplies:
I'd like to enter this card into the following challenges:
Challenges 4 Everybody - Anything Goes
Scribble & Scrap - Anything Goes
That Craft Place - Anything Goes
Crafting at the Weekend - Anything Goes
Friday, 2 May 2014
Like A Rhinestone Cowgirl...
.........Riding out on a horse in a star-spangled rodeo....ok, ok I know it's a Rhinestone Cowboy, but that song was stuck in my head the whole time I was colouring up this little cutie for today's challenge over at the Graphic Marker Blog. As you may have already guessed our theme is PINK! Remember you don't need to use Graph 'It markers to enter, simply follow the theme.
Also, don't forget we have our fantastic Blog Candy up for grabs - you can win £200 of stash HERE!!
Oh and I need to give you a heads up to tune into Create and Craft TV on 8th May for another fabulous Graph'It TV show with Nikky! If you can't watch on Sky 671, Freeview 36 you can watch online at www.createandcraft.tv both live during the show and online after the show on catchup so don't worry about missing it!
As if that wasn't enough Polkadoodles is celebrating it's 5th Birthday today, so to celebrate there is a blog hop, but not any old blog hop this one has freebies along the way..... here's a little taster of what's up for grabs, so I really hope you'll come and join in the fun.
I coloured the cowgirl from the new Work & Play Collection 3 CD (which is also available as a digi download) using the following Graph 'It Markers:
Also, don't forget we have our fantastic Blog Candy up for grabs - you can win £200 of stash HERE!!
Oh and I need to give you a heads up to tune into Create and Craft TV on 8th May for another fabulous Graph'It TV show with Nikky! If you can't watch on Sky 671, Freeview 36 you can watch online at www.createandcraft.tv both live during the show and online after the show on catchup so don't worry about missing it!
As if that wasn't enough Polkadoodles is celebrating it's 5th Birthday today, so to celebrate there is a blog hop, but not any old blog hop this one has freebies along the way..... here's a little taster of what's up for grabs, so I really hope you'll come and join in the fun.
After all that excitement I almost forgot to show you my card! Lol! This was a fairly quick and easy card to make and the best part was I got to play with loads of new products :D
I coloured the cowgirl from the new Work & Play Collection 3 CD (which is also available as a digi download) using the following Graph 'It Markers:
Hair 1110,1270, 3245
Skin 4170, 4155, 4135, 4115
The star sentiment also came from the CD, and was coloured with a 5130 Graph 'It pen and blinged up with some gemstones.
I die cut the bunting using the fantastic Doobadoo Fabric (which has a fused plastic backing and so cuts really easily and doesn't fray). The star and heart button emblishments are laser papercuts from Doobadoo which have again been coloured with a Graph 'It Marker. The lasso is made from a piece of bakers twine.
Thanks for stopping by today.
Claire x
Thanks for stopping by today.
Claire x
Products Used:
I'd like to enter this card into the following challenges:
Crafts Galore Encore Challenge - Anything Goes
Just B Creative Crazy - Anything Goes
Crafting By Design - Anything Goes
Simon Says Stamp - Anything Goes
Crafting From The heart - Anything Goes
Saturday, 26 April 2014
Quick and Easy Cards!
As the title would suggest I've got a selection of quick and easy cards to show you today. I don't know about you, but I find that most people I know now expect a handmade card and are visibly disappointed when I present them with a shop bought one. So when last weekend I suddenly realised that Sunday was going be Easter Sunday I kind of panicked as I normally send out a handful of cards to various friends and family who celebrate.
After a little bit of thought I suddenly remembered that there were some uber cute little birds on the Candy Doodles CD that could easily be recoloured to look like chicks and would therefore be ideal for an Easter card. I'd also spotted on the Polka Doodles DT blog that an upcoming challenge was for Easter/Spring and as I haven't made anything for the challenge blog for ages that I'd also join in over there!!
So here's what I came up with. You'll notice I didn't stop at Easter cards I also knocked up a few Birthday cards to add to my stash too!! These were so quick and simple that it seemed rude not too!
Firstly I opened a word document and using the shape tool drew a square measuring 9cm x 9cm and changed the outline to 0.05pt so it was nice and fine. I then opened up the bird image from the Candy Doodles CD in Paint and recoloured and copied it. I then pasted the bird into the word document and resized it to fit into the square , before copying and pasting and rotating the image to create a mirror image.
I then added a text box with no outline and typed my sentiment, before dragging it into position. Once I was happy with the layout I grouped the images and simply copied and pasted the desired number on the page. At this stage I decided I didn't want the birds to be all the same colour so I recoloured them and I also changed the sentiments before hitting the print button.
Once printed it was simply a case of using the squares as guide for trimming to size before matting and layering the image onto a card base.
To finish I simply tore some strips of Washi Tape for grass and re-drew the birds legs with a fineliner, before adding a line from the birds beaks to the sentiment.
I hope that you'll join us for the Easter/Spring challenge.
Claire x
Products Used:
After a little bit of thought I suddenly remembered that there were some uber cute little birds on the Candy Doodles CD that could easily be recoloured to look like chicks and would therefore be ideal for an Easter card. I'd also spotted on the Polka Doodles DT blog that an upcoming challenge was for Easter/Spring and as I haven't made anything for the challenge blog for ages that I'd also join in over there!!
So here's what I came up with. You'll notice I didn't stop at Easter cards I also knocked up a few Birthday cards to add to my stash too!! These were so quick and simple that it seemed rude not too!
Firstly I opened a word document and using the shape tool drew a square measuring 9cm x 9cm and changed the outline to 0.05pt so it was nice and fine. I then opened up the bird image from the Candy Doodles CD in Paint and recoloured and copied it. I then pasted the bird into the word document and resized it to fit into the square , before copying and pasting and rotating the image to create a mirror image.
I then added a text box with no outline and typed my sentiment, before dragging it into position. Once I was happy with the layout I grouped the images and simply copied and pasted the desired number on the page. At this stage I decided I didn't want the birds to be all the same colour so I recoloured them and I also changed the sentiments before hitting the print button.
Once printed it was simply a case of using the squares as guide for trimming to size before matting and layering the image onto a card base.
To finish I simply tore some strips of Washi Tape for grass and re-drew the birds legs with a fineliner, before adding a line from the birds beaks to the sentiment.
I hope that you'll join us for the Easter/Spring challenge.
Claire x
Products Used:
I'd like to enter this project into the following challenges:
Friday, 25 April 2014
Adrift...........
Isn't she beautiful? This was another of my norty but nice stash purchases that I've only just got round to playing with!! However, the real reason for this post is to let you know about the fabulous challenge GREYS over on the Graph'It Marker Challenge Blog and to announce that I've joined the design team! :)
I'd really love it if you could join us - you don't need to use Graph'It Markers, you simply need to follow the theme set for the challenge. Also, don't forget to pop over to the blog to join in with our Birthday Candy - it is absolutely amazing and I'd love it if one of my followers were to win.
Anyway, I've decided to keep this make fairly simple to show off the image (as for once I'm actually pretty pleased with my colouring). I've attempted grey sky and moving water!!! Eeek!!
For those of you interested, the colours I used are as follows:
Water: Cool Grey 0 (9100), Cool Grey 1 (9101), Cool Grey 3 (9103)
Sky: Neutral Grey 1 (9501), Neutral Grey 4 (9504), Neutral Grey 6 (9506), Blender (0000)
Skin: Light Caramel (4170), Skin (4155), Powder (4135), Cotton (4115)
Boat: Smoke (3210), Lichen (3230), Havana (3245), Bronze (3250), Cigar (3255), Mocha (3280)
Figure/Flowers: Ghost (4125), Burgundy (5280), Aqua (6110), Lavender (6140), Bougainvillea (6170), Anise (8250), Military (8280)
The white spray was created using my new white Shake Marker from Graph'It - I actually have to say I love it!!! It goes on as a transparent liquid but drys opaque. To create the spray I dabbed the pen around the helm of the boat and then blended it with my fingers. Once it was dry and I was happy with the placement of the spray I gently built it up to increase the depth and tone.
I created the frame from an embroidery hoop which I covered with modelling paste and then painted with re-active paint. I added some punched flowers and leaves that have been painted with the re-active paint. Finally I attached the image to the frame.
Thanks for stopping by today.
Claire x
Supplies:
I'd like to enter this project into the following challenges:
Crafty Girls - Anything Goes
C.R.A.F.T - Not a card
Crafty Ribbons - Anything but a card
Ecletic Paperie - Wood (Frame and boat)
Altered Electics - Anything Goes
One Crazy Stamper - Anything Goes
Rhedd's Creative Spirit - Altered Art
That Craft Place - Anything Goes
Simon Says Stamp - Big Stamp
Wednesday, 16 April 2014
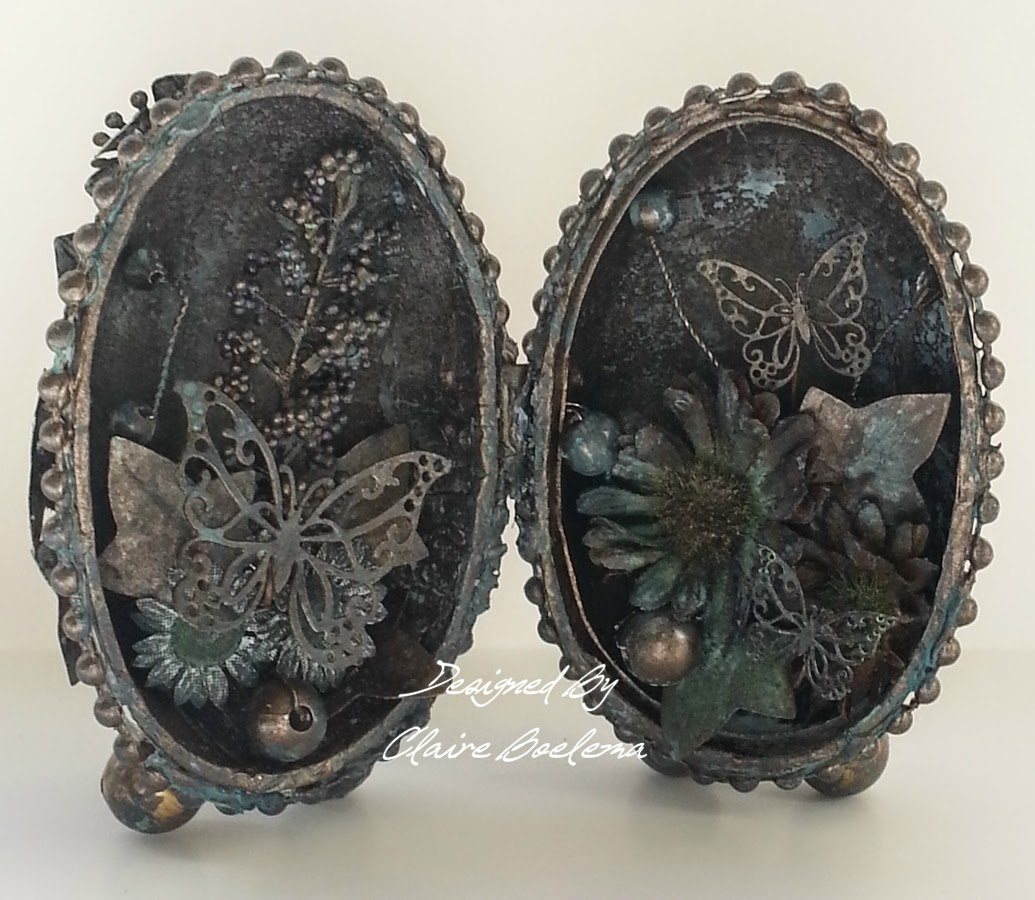
Faux Bronze Egg
I've got another one of those little altered cardboard eggs to show you today. This was actually the first one I created after being inspired by the new Dutch Doobadoo Butterflies which I received in the post. If you haven't seen them, then you really need to take a peek - they are STUNNING (so much so I've already ordered some more!!!)
To be totally honest with you, when I first looked at the butterflies I thought they were going to be really flimsy as they are so intricate and delicate looking, but I was wrong! They are amazingly robust, so much so that they took two coats of paint and a light misting with a reactor agent.
So what did I do? Well the first thing I did was to remove the inner lip from the edge of the egg so that I could place a hinge to allow the egg to be opened and closed. Next I coated the egg with a generous coat of Gesso.
Whilst I waited for the Gesso to dry I started painting all of the objects that I intended to use on the project with Vereday Paint. Once I'd covered everything with two coats of paint I lightly spritzed it with the reactor solution and left it to work it's magic.
Once the egg and decorative pieces were completely dry I assembled the egg et voila!!
Now I know this isn't to everyone's liking but I had fun making it and I actually quite like the finished item. I'm going to give this to my MIL instead of an Easter Egg as she's diabetic and can't have ordinary chocolate and doesn't like the diabetic stuff!
These eggs are quite addictive and I have another one in the pipeline already! I just hope that I can complete it before Easter!!!
Thanks for stopping by today.
Claire x
Supplies:


I'd like to enter this project into the following challenges:
Altered Eclectics - Anything Goes
Just B Creative Crazy - Anything Goes
Rhedd's Creative Spirit - Altered Art Only
Everybody Art Challenge - Anything Goes
Papertake Weekly - Easter
Pause, Dream Enjoy - Anything Goes
Through The Craftroom Door - Anything Goes
Artistic Inspirations - Anything Goes/Monochrome
Simon Says Stamp Monday Challenge - Winged Things
That Craft Place - Anything Goes/Easter
To be totally honest with you, when I first looked at the butterflies I thought they were going to be really flimsy as they are so intricate and delicate looking, but I was wrong! They are amazingly robust, so much so that they took two coats of paint and a light misting with a reactor agent.
So what did I do? Well the first thing I did was to remove the inner lip from the edge of the egg so that I could place a hinge to allow the egg to be opened and closed. Next I coated the egg with a generous coat of Gesso.
Whilst I waited for the Gesso to dry I started painting all of the objects that I intended to use on the project with Vereday Paint. Once I'd covered everything with two coats of paint I lightly spritzed it with the reactor solution and left it to work it's magic.
Once the egg and decorative pieces were completely dry I assembled the egg et voila!!
Now I know this isn't to everyone's liking but I had fun making it and I actually quite like the finished item. I'm going to give this to my MIL instead of an Easter Egg as she's diabetic and can't have ordinary chocolate and doesn't like the diabetic stuff!
These eggs are quite addictive and I have another one in the pipeline already! I just hope that I can complete it before Easter!!!
Thanks for stopping by today.
Claire x
Supplies:

I'd like to enter this project into the following challenges:
Altered Eclectics - Anything Goes
Just B Creative Crazy - Anything Goes
Rhedd's Creative Spirit - Altered Art Only
Everybody Art Challenge - Anything Goes
Papertake Weekly - Easter
Pause, Dream Enjoy - Anything Goes
Through The Craftroom Door - Anything Goes
Artistic Inspirations - Anything Goes/Monochrome
Simon Says Stamp Monday Challenge - Winged Things
That Craft Place - Anything Goes/Easter
Wednesday, 9 April 2014
The Easter Bunny has a treat in store for you........
Oh yes he does!! How would you like to get your hands on the gorgeous little image I've used today? Well you can. Nikky Hall has drawn this gorgeous little Easter Bunny Tatty Twinkle for Tattered Lace and they have decided to give her away as a freebie! To claim her simply hop over to the Crafting website. Nikky has also got some freebie papers for you all too, so hot foot it over to Polka Doodles to claim them.
Apologies in advance but this post is picture heavy and it STILL doesn't do the project justice! Don't think I'll be giving up the day job anyday soon to become a Photographer!
I decided that I needed to start using these tacky cardboard Easter eggs that I'd had knocking around in my stash for what seemed like forever. So what better use than to make a cute little scene?
I added a cardboard hinge to the egg and then covered it completely in course modelling paste.
Whilst I waited for it to dry I coloured up the images using my Graph'It markers and added a bit of sparkle with a Shake It Glitter Marker.
Once the paste was dry I hot glued some beads onto the base for feet and then painted the egg and added some Maimeri Iridescent Paste to some Gold Acrylic Paint which gives it a pearly shimmer.
Once dry I added a row of pearls. Then I painted the inside of the egg and added some florists moss for the grass before securing the images into the scene. You can see the scale I was working on in the picture above (I have placed a £2 coin in-front of the egg).
To finish the scene I added some of the gorgeous little butterflies from the Dutch Doobadoo range.
Finally, I decorated the outside of the egg with some die cut leaves, mini rosebuds and some more of the Doobadoo Butterflies.
Don't forget to check out the rest of the creations using this cute little stamp, there are truly inspiring projects.
Thanks for stopping by today.
Claire x
I'd like to enter this project into the following challenges:
All Crafts Challenge April/May - Anything goes but no cards!
Artistic Inspirations - Anything Goes Easter Animal
Follow my blog with Bloglovin
Apologies in advance but this post is picture heavy and it STILL doesn't do the project justice! Don't think I'll be giving up the day job anyday soon to become a Photographer!
I decided that I needed to start using these tacky cardboard Easter eggs that I'd had knocking around in my stash for what seemed like forever. So what better use than to make a cute little scene?
I added a cardboard hinge to the egg and then covered it completely in course modelling paste.
Whilst I waited for it to dry I coloured up the images using my Graph'It markers and added a bit of sparkle with a Shake It Glitter Marker.
Once the paste was dry I hot glued some beads onto the base for feet and then painted the egg and added some Maimeri Iridescent Paste to some Gold Acrylic Paint which gives it a pearly shimmer.
Once dry I added a row of pearls. Then I painted the inside of the egg and added some florists moss for the grass before securing the images into the scene. You can see the scale I was working on in the picture above (I have placed a £2 coin in-front of the egg).
To finish the scene I added some of the gorgeous little butterflies from the Dutch Doobadoo range.
Finally, I decorated the outside of the egg with some die cut leaves, mini rosebuds and some more of the Doobadoo Butterflies.
Don't forget to check out the rest of the creations using this cute little stamp, there are truly inspiring projects.
Thanks for stopping by today.
Claire x
I'd like to enter this project into the following challenges:
All Crafts Challenge April/May - Anything goes but no cards!
Artistic Inspirations - Anything Goes Easter Animal
Follow my blog with Bloglovin
Sunday, 6 April 2014
Getting Plastered!
This is a fun little sample that I made for the TV launch of Work & Play 1. It was a fairly easy card to make once I'd decided where I was going with it.
I'd seen this style of base card around a few blogs and so thought I'd have a go at creating my own. I'm really glad I did as they are excellent for creating scenes and offer a sturdy base which won't topple over once you start adding dimensional items.
I covered the base with the wood effect paper from the cd and then added the brickwork paper to the upright part of the card. I then used some Maimeri modelling paste to cover the brickwork, leaving gaps as though it had fallen off. To create the cracks I simply scrunched a plastic bag up and dabbed it onto the paste whilst wet.
Whilst the paste dried I coloured up Handyman Dave available from the CD or individually as a digi download with Graph'It Markers and then fussy cut him out. I also made the plaster's Hawk and Trowel from a piece of silver card, the "plaster" is a dollop of the modelling paste. The bucket is a clear plastic lid from a body spray which has been painted with silver acrylic paint and then filled with a drop of white acrylic paint. I used a cocktail stick to obtain the paint dribbles. The little paint brush is made from rolled and folded paper. The planks of wood were cut from the wood effect paper.
Once the paste was completely dry I assembled the card as shown attaching the sentiment with some brads I found in my stash.
Thanks for visiting today.
Claire
I'd like to enter this card into the following challenges:
Catch The Bug - Anything Goes
Kit & Clowder - Something Blue
Word Play Saturday - Anything
Craftitude - Anything Goes
Jo's Scrap Shack - Anything Goes
Sister Act Card Challenge - Anything Goes
Crafts & Me - Anything Goes
Just B Creative Crazy - Anything Goes
The Crafting Cafe - One for the boys
4 Crafty Girls - Anything Goes
Divas By Design - Anything Goes
Little Red Wagon - Make It Masculine
Through the Craft Room Door - Anything Goes
Craftin Desert Divas - Anything Goes
Paper Crafting Challenges - Masculine
I'd seen this style of base card around a few blogs and so thought I'd have a go at creating my own. I'm really glad I did as they are excellent for creating scenes and offer a sturdy base which won't topple over once you start adding dimensional items.
I covered the base with the wood effect paper from the cd and then added the brickwork paper to the upright part of the card. I then used some Maimeri modelling paste to cover the brickwork, leaving gaps as though it had fallen off. To create the cracks I simply scrunched a plastic bag up and dabbed it onto the paste whilst wet.
Whilst the paste dried I coloured up Handyman Dave available from the CD or individually as a digi download with Graph'It Markers and then fussy cut him out. I also made the plaster's Hawk and Trowel from a piece of silver card, the "plaster" is a dollop of the modelling paste. The bucket is a clear plastic lid from a body spray which has been painted with silver acrylic paint and then filled with a drop of white acrylic paint. I used a cocktail stick to obtain the paint dribbles. The little paint brush is made from rolled and folded paper. The planks of wood were cut from the wood effect paper.
Once the paste was completely dry I assembled the card as shown attaching the sentiment with some brads I found in my stash.
Thanks for visiting today.
Claire
I'd like to enter this card into the following challenges:
Catch The Bug - Anything Goes
Kit & Clowder - Something Blue
Word Play Saturday - Anything
Craftitude - Anything Goes
Jo's Scrap Shack - Anything Goes
Sister Act Card Challenge - Anything Goes
Crafts & Me - Anything Goes
Just B Creative Crazy - Anything Goes
The Crafting Cafe - One for the boys
4 Crafty Girls - Anything Goes
Divas By Design - Anything Goes
Little Red Wagon - Make It Masculine
Through the Craft Room Door - Anything Goes
Craftin Desert Divas - Anything Goes
Paper Crafting Challenges - Masculine
Subscribe to:
Posts (Atom)


+(1).jpg)


