Showing posts with label card. Show all posts

Friday, 12 October 2018

Shaped Elephant Card

I just wanted to share this gorgeous little Elephant Card with you. It's another of my DT projects for docrafts. Full project details can be found here: https://www.docrafts.com/Blog/elephant-card/964


Thanks for stopping by today.

Claire x

Friday, 5 August 2016

Life's a beach when you're 18!!!


My baby girl is finally 18!!! I say finally, because it been really hard for her as she's the baby of her social group and has waited for what seems to be forever to be able to go out to the pubs and clubs with her friends.


We're taking her on holiday as part of her birthday celebrations, so hopefully she'll get to enjoy a few cocktails on the beach with us. In view of this I thought this card would be very fitting.


I'm not sure that my photos do this card justice but hopefully you'll be able to see all the dimension and glittery bits. If you have any questions, please feel free to message me either by email, Facebook or Instagram. I always respond and promise that I don't bite!


I inked a simple background with Peacock Feathers and Squeezed Lemonade Distress Inks before cutting a strip of vellum and and heat embossing the Happy Birthday sentiment. Next, I drew a cocktail glass body and traced it onto acetate. Prior to cutting it out I added some "flaps" to the sides of the glass (these are folded and tucked into slits in the inked background to make the glass 3D). Next I cut a simple stem and die cut a circle for the base. I then cut matching vellum shapes.


The vellum was coloured using Distress Inks and secured with strategically placed glue dots. Next I lightly marked where the glass was to be placed on the inked background and cut slits about 1/2cm  in towards the centre of the glass from the edges. I ran double sided tape down the acetate flaps and slotted the glass body into place. I cut a piece of vellum to create the back of the glass and then carefully ran silicone glue around the entire rim of the glass before coating generously with diamond dust. I then assembled the remaining parts of the glass and added a straw that I had cut in half.


I stamped and heat embossed the glasses from the Susan K Weckesser  and added vellum and acetate "glass" to them. Next I stamped, coloured and cut out several flowers, leaves and shells from the stamp sets listed below. and attached them to the card with silicone glue. To finish I added lots of glitter and some 3D gloss glue.

I hope you like my little creation but more importantly I hope she likes it!

Thanks for stopping by today.

Claire x

Stamp Sets used:

I'd like to enter this project into the following challenges:

Monday, 18 July 2016

Mixing things up with Docrafts Woodland Gift Tags and Creativity Magazine Free Gifts!

So I picked up this months Creativity Magazine and as always there were some amazing free gifts in the shape of a set of four double sided wooden postcards and some Wilson Wood stickers. I also happened to get my hands on the new Woodland Gift Tags dies which from the very first moment I saw them I knew that I was going to end up buying them!

I made this little card using one of the postcards and the dies. I'm really pleased with the way it turned out.


Paint the scene on the wooden postcard with watered down Artiste acrylic paints. Remove the sign post sticker from the free Wilson Wood stickers and cut out the text from another sticker. Mount onto cardstock and arrange the letters as desired. Using the Woodland Gift Tags Die and A4 Premium Textured Cardstock cut several leaves, toadstools and animals. If desired dry brush detail onto the animals using Artiste Acrylic Paints and Brushes. Arrange all of the elements onto the postcard and secure with Stick It Silicone Glue. To finish add 3D Clear Gloss to the mushrooms and acorns.

Thanks for stopping by today.

Claire

Supplies:
Creativity Magazine
Woodland Gift Tag Dies
A4 Textured Cardstock
Acrylic Paints
Brushes

I'd like to enter this project into the following challenges:
613 Avenue Create - Anything goes
Dragonfly Dreams - Anything goes
Simon Says Stamp - Create a scene
The Corrosive Challenge - Nature/Animals
Crafty Friends Challenge - Use your dies
Animal Friends Challenge - Anything goes
Crafts & Me - Anything goes
Cut It Up - Die cuts

Thursday, 7 April 2016

Oh so pretty......

Another card created using Polkadoodles Stamp Soup for Create and Craft TV show.


I stamped the images using Archival Ink onto cartridge paper and then coloured them using Distress Inks. I couldn't not add a little sparkle and shine so added some Stardust Stickles and Glossy Accents to the dragonflies. I'm not sure if the picture below shows this off slightly better?


Thanks for stopping by.

Claire x

I'd like to enter this card into the following challenges:
Craft Stamper - Spring Flowers

Monday, 4 April 2016

Pretty papers birthday card

A really quick birthday card made for a friend using pretty summery papers.


Thanks for stopping by today.

Claire x

I'd like to enter this card into the following challenges:
A Gem of a Challenge - Don't be a square
Crafty Calendar - Anything goes
Aud Sentiments - Birthday
Crafting with an attitude - Anything goes
Crafty Girls Creations - Anything goes

Thursday, 31 March 2016

A Quick Monochrome Card

Sorry...... it's yet another Stamp Soup sample! This was another one made for the Create and Craft TV launch. It's super simple and yet (I think) really effective.


I've simply used the 1st, 2nd and 3rd generation stamp impressions to create the flower, added a couple of leaves and a stem and then stamped the sentiment. The image has then been matted and layered onto some silver glitter tape and black card.

Thanks for stopping by today.

Claire x

I'd like to enter this card into the following challenges:
4 Crafty Chicks - anything goes
Crafty Girls - anything goes
Crafting by design - anything goes
Inspiration Destination - anything goes
Simon Says Stamp - anything goes
Lemon Shortbread - anything goes
Artistic Inspirations - anything goes
613 Avenue Create - anything goes
Amusing Challenges - anything goes

Saturday, 4 August 2012

It's A Pile Of Poop!!!

Charming I hear you say! LOL. Well take the post title as warning for what's coming! :D Yep it's another TV sample from the Polka Doodles Here Comes Christmas CD.
When I saw this sentiment on the CD it immediately appealed to the inner child in me and I knew that I was going to have to use it! The only thing was on what? So after a little bit of thought I decided that I'd adapt the template from the tealight card that I made a couple of years back and fill it with poop (aka Mint Imperials). I'm going to have to make a couple more of these as DS spotted it and asked if he could have it for his Christmas card and my friend also saw it and has asked me to make one for her son! Anyway, what do you think?

I'm pushed for time this week, so I won't go into my usual explanation of what I did, instead I'll list the materials. If you want further details please do feel free to email me or leave a comment below and I will get back to you.

Materials:
Here Comes Christmas CD
Promarkers
Marianne Designs Creatables LR0125
Memorybox Button Die
Glossy Accents
Black Copic Spica Glitter Pen
Martha Stewart Zig Zag Punch
Walnut Stain Distress Ink
Acetate

Thanks for stopping by today.

Claire x

I'd like to enter this card into the following challenges:
Inspire Me Fridays - Anything Goes
The Stampman - Anything Goes
Art Impressions Stamps - Stitching
Paper Crafting Journey - Anything goes
Die Cutting Divas - Anything goes
Holly Jolly Christmas Challenge - Christmas Gift Box
Make It Monday - Anything Goes

Sunday, 30 May 2010

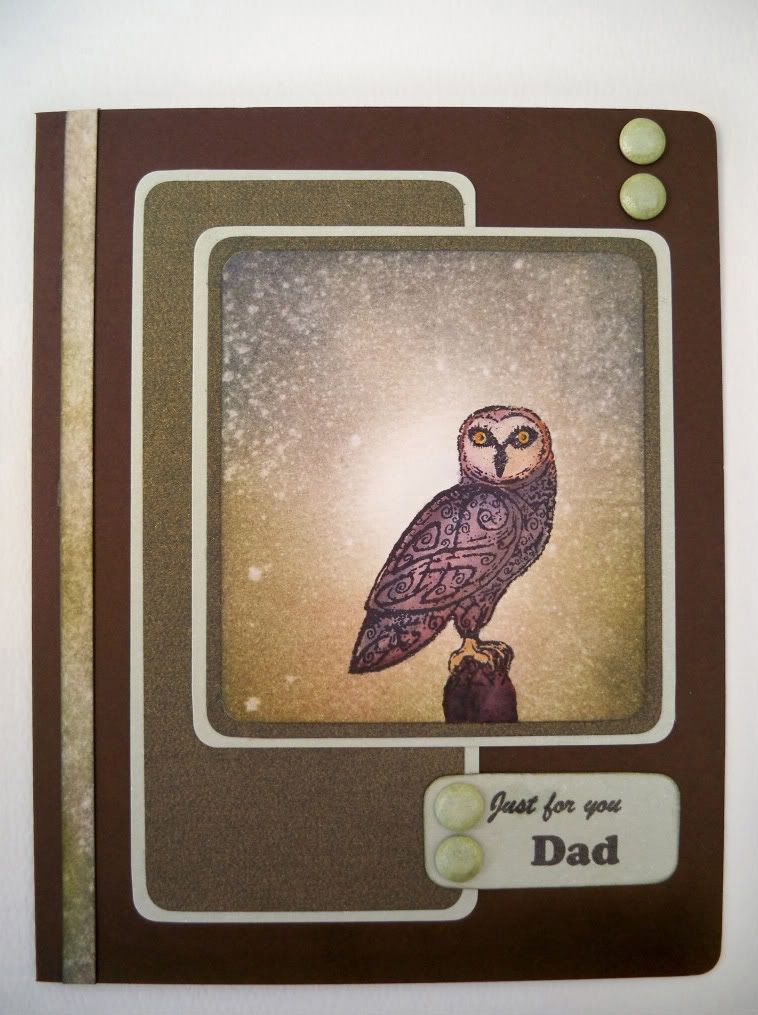
Father's Day Card Using Distress Inks

As some of you know, I went to a Demo this morning at a local craft store. Although I'd already got some distress inks and used them on few projects, I hadn't fully appreciated how versatile they can be. The only problem is I now have not only a Promarker habit but a Distress Ink one too!!!

The fabulous Lindsay Mason was demonstrating Ranger products and I can now thank her for making me a fair bit poorer financially, but a whole lot richer creatively! I learnt loads of new techniques and gleaned loads of wonderful tips. I was so keen to make something that I came home and made this card.

The background that the image is stamped onto was created using Distress Inks which have then been sprayed with water and blotted with tissues. I've then stamped the owl and coloured it using Distress Inks. The image has then been matted and layered. The Card Candy has been coloured with Promarkers.

Tools
Purple Cows Guillotine
Mister Bottle
X-cut corner punch
Tim Holtz Blender
Waterbrush
Tissues

Materials
Cardstock & Papers - The Papermill
Tim Holtz Distress Inks (Chipped Sapphire, Broken China, Victorian Velvet, Forest Moss, Spiced Marmalade, Brown Corduroy)
Swirly Bird Stamps - Personal Impressions
Anita's Tacky Glue
Card Candy - Craftwork Cards
Promarkers (Marsh Green)

I'd like to enter this card into the following challenges:
The Pink Stamper - Father's Day
Pear Tree Designs - sketch
Crafty Catz Challenge - the boyz are back
Passion for Promarkers - anything goes
Related Posts Plugin for WordPress, Blogger...